

Top 5 Ways to Increase Garage Door Remote Signal Range
The garage door opener remote range is influenced by several factors. Interference, antenna position and radio frequency determine signal strength. Here are some tips and tricks for troubleshooting poor remote reception.
Poor garage door opener range is a common problem among homeowners. Pulling up to your driveway and pressing your remote control button several times with nothing happening is incredibly annoying . Inching closer and closer to the door you continue pressing and even holding the button down – again no result. Finally, your front bumper is just a few feet from your overhead door opening. Frantically hitting the remote button the door finally opens, but what good does a remote control do if you have to be inches away from the opening for it to work?
Bad remote signal range is a frustrating problem that you will likely deal with at some point. After moving into a gated community in Florida I was issued a Liftmaster single button remote control. Initially I could open the gate with my remote from the adjacent road – over 100 feet away! Gradually, my range decreased over time to the point where I had to pull up to within a few feet of the gate arm and play with the button, holding it down and clicking it in a systematic method. Worse yet, the same thing begin happening with my garage door opener at home.
What could possibly have caused my remote to lose signal range? After some experimenting, I was able to troubleshoot the problem and came up with a list of ways to increase your garage door remote signal. Here are the methods and products that boosted my opener range. The troubleshooting steps and fixes are in specific order priority.
1. Maximum Remote Distance
2. Replace Remote Opener Batteries
3. Check for Interference – LED & CFL (Fluorescent) Light Bulbs
3.1 Change Remote Frequency -310 mhz 315 mhz 390 mhz
4. Upgrade Remote Controls
5. Install Antenna Extension
6. Relocate Your Antenna Away From Known Interference
7. Power Down Troubleshooting Test
8. Multiple Garage Door Opener Troubleshooting Test
1. Maximum Remote Distance
What is the typical range for a garage door remote control? The range of garage door openers depends on a number of factors and will be unique to every building. Remotes are designed to give a signal that can be read by the openers internal receiver from a minimum of 4-5 car lengths away.
Typically that means you are able to open your remote as you pull into your driveway. This is designed as a safety feature so prevent operation of the door when the user is too far away to ensure safe operation. Manufacturers calculated the average safe view-able distance and designed their products accordingly to prevent serious injury. They were also confined by FCC regulations which limited power to the devices. It doesn’t end there – manufacturers are limited on the frequencies they can use as well.
The receiver built into your garage door opener can’t accept more than one signal at any given time. If an electronic device in or near your garage is emitting a signal near the same frequency as your remote it will cause interference. If your garage door operator works by pressing your wired wall button, but not your remote control there is a strong chance you have interference.
I have heard of some homeowners being able to open their garage doors from upwards of 200ft plus! Since you have navigated to this troubleshooting article I’m going to assume you aren’t one of those lucky people with a long remote signal range. The first step is always the simplest and cheapest, so lets get started.
2. Replace Remote Opener Batteries
Most people rarely check the age of batteries in their electronic products, especially their garage door opener remotes. The first step to take in troubleshooting poor remote reception is replacing your batteries. It is the least expensive and time consuming troubleshooting option. Batteries in your remote control should be replaced every 3 to 5 years. Old batteries will definitely decrease the strength of your signal and can corrode the metal circuits inside your remote control.
Even if you have recently purchased a new remote or replaced batteries you should still trying testing them. Batteries and remotes can sit on warehouse shelves for years before ever making to your doorstep – they could be dead on arrival.


Batteries are inexpensive and can be replaced in just a few minutes. Some garage door dealers with walk in showrooms may even offer battery replacement as a free service – especially if you are an existing and repeat customer. At the very least they should have common remote batteries available for purchase. There are a few main types of batteries found in garage door remote controls. The two main batters are models CR2032 and CR2016. Some older remote controls may even take a common 9 volt or 12 volt battery. If you can’t see to find these circular remote batteries at home, here are some sources to find them online.
Most remote controls have two mechanisms to take the cover off. You will need either a tiny phillips screwdriver or a clip to pop the remote cover off. Look at the back case of your remote control to figure out how your remote cover is secured. If you can’t find a screw then you probably have a pop off cover.
To pop the cover off you can use the visor clip, knife, flathead screwdriver or coin. Insert whatever tool you choose into the space where the remote covers connect. Twist in the small gap and the top cover should pop off. Usually remotes have a small cutout template space on the side for easy replacement. Once you have the cover off your remote remove the old battery and insert the new one.
Be sure to install the new battery in the correct position. Installing the battery backwards or upside down will cause the remote to not receive power.
3. Check for Interference – LED & CFL (Fluorescent) Light Bulbs
Some electrical components are more likely to create interference than others – including TV cable, amps, surge protectors, fluorescent & LED lighting, battery chargers, deep freezers. Also anything that uses a timer like sprinkler systems, alarms and lights. If your range issues are infrequent you can assume that the component responsible for the interference is being used during these times. Bottom line, if you recently installed an electrical device in your garage and your remotes suddenly lose range there is a good chance that is the culprit.
Do you live next to a business with a sophisticated security system? Airports, prisons, communication and radio towers are notorious for interfering with garage door opener signals – even satellite TV dishes. Subtle changes in the electronic layout of your home can decrease remote control signal. Take notice of any changes made around your garage when you notice poor range on your opener. If your garage is in close proximity of a neighbor their electrical devices can interfere as well.
Have you recently installed new lights in your garage or in your opener? Some LED & Fluorescent light bulbs can interfere with the signal of your garage door remote. The driver (a small part inside the bulb) can produce a RF that can block out your remote – or even cause your operator to open the door on its own. Check out our article that explains more on this subject – Light Bulbs For Garage Door Openers: Incandescent CFL LED
All LED light bulbs aren’t created equal so stick with a name brand light bulb. Knock off brands seem to be the main culprit in weakening your garage door opener signal. If you have recently changed any lighting around your opener and noticed a weakening signal, chances are the light bulbs are the cause. Major brand names like Chamberlain, Liftmaster, Craftsman and Genie have come out with light bulb recommendations. Always follow manufacturer specifications when installing new or replacement bulbs.
3.1 Change Remote Frequency -310 mhz 315 mhz 390 mhz
New Chamberlain Liftmaster garage door openers run on 315 mhz![]() frequency, while older machines used 390 mhz
frequency, while older machines used 390 mhz ![]() . If you have a garage door opener system from before 1993, it probably uses a series of dip-switches. Changing frequency is one way to improve your remote control signal. This can be accomplished by installing a different circuit board (logic board) with new remote controls.
. If you have a garage door opener system from before 1993, it probably uses a series of dip-switches. Changing frequency is one way to improve your remote control signal. This can be accomplished by installing a different circuit board (logic board) with new remote controls.
It can also be achieved by using an external receiver that plugs into a near bye wall outlet converting your opener to receive a different frequency. If you have trouble with remote control range and your garage door opener system was manufactured before 1993 (photo eyes required) its time to invest in a new system. Chamberlain Liftmaster has new garage door openers that run on dual and tri- band frequency, meaning the remote controls will automatically determine the best signal to use.
You can usually tell the frequency your garage door receiver uses based on the “Learn Button” on the back of the motor or in some cases the antenna color. Here are common frequency color codes:
- Yellow Learn Button – 310 Mhz 315 Mhz 390 Mhz Tri-Band Security+ 2.0 Years – 2012 to present
- Purple Learn Button – 315 Mhz Security + Years 2005 to present
- Red Learn Button – 390 Mhz Rolling Code SECURITY+ Years 1997 to 2005
- Orange Learn Button – 390 Mhz Rolling Code SECURITY+ Years 1997 to 2005
- Green Learn Button – 390 Mhz Billion Code Years 1993-1997
- Dipswitches – 300-400 Mhz Years 8-12 switches Years 1984-1993
If for some reason you cannot find the learn button or antenna on your operator you may be able to find a remote control model number to cross reference. You can always call the Chamberlain Liftmaster customer support line or do a google image search online. The 850 LM universal receiver works with most openers and provides some of the best range from my testing.

4. Upgrade Remote Controls
Sometimes the contacts on your remote control can wear out. You can try bending the metal contacts that touch the battery back into place. Remotes that are ten years old or more often have buttons that are worn out. If you have electric tape holding your remote control together, it is probably time for a replacement.
Many professional garage door dealers have machines that can test the strength of your signal. They can also help troubleshoot problems with your garage door opener system. If your remote control easily programs to a motor in a professional garage door showroom you can eliminate it as part of the problem.
Your remote control should usually have an indicator light feature. On most liftmaster remotes a red light should come on or flicker to alert the user that it is emitting a signal. If you press your remote and an indicator light doesn’t appear there is a good chance it has a dead battery, worn contact points or has been damaged.
Consider upgrading your remote to the Liftmaster Chamberlain universal keychain remote model 374UT or model 375UT visor clip on remote. . These remotes can be programmed to all major brands with the exception of Wayne Dalton, Hormann or dipswitch remotes. Both remotes are compatible with the 3 frequencies listed above and have 2 button operation.

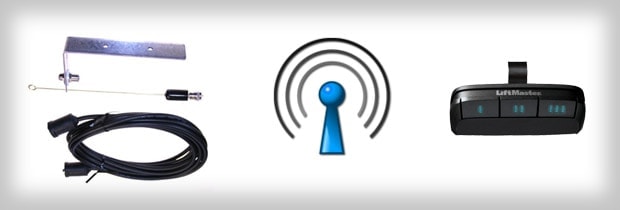
5. Install Antenna Extension
Most residential garage door openers have an antenna that hangs down from the operator casing. It is usually going to be colored purple, green, red, gray or black. Your antenna should be hanging down from the operator casing directly underneath the opener so that it has a clear path of communication with a remote control. Although this 10″ antenna should be long enough to receive a signal it can be easily improved on.
There are two models of the antenna extension mounting kits available, 86LM or 86LMT. The kit sinclude only the L-shaped bracket with the coaxial connection and a length of coaxial cable. It does not include the brass antenna.
- 41A3504 – Antenna Kit, 15 Ft of Coaxial Cable & Mounting Bracket Included
- 86LM – 15FT of Coaxial Cable & Mounting Bracket Included (No Antenna)
- 86LMT – 25FT of Coaxial Cable & Mounting Bracket Included (No Antenna)
- 41C3196 – Antenna compatible will everything except 850LM receiver
- K77-36541 – Special Bent Antenna for use with 850LM receivers
- EXA-1000 – Linear/Liftmaster Commercial Gate Opener Antenna

6. Relocate Your Antenna Away From Known Interference
Do you have a sound or security system in your garage that you really don’t want to relocate? There are a few solutions in this scenario.
- Unplug your garage door opener from the outlet to avoid electrocution.
- Make sure your door is in the closed position so that nobody can enter the garage knocking you off of a ladder etc.
- Locate your external antenna (purple,red, green, gray, yellow) wire hanging from the operator.
- Remove that back cover of your opener to figure out how the antenna is wired. Most antennas are soldered on to the logic board. You will need to de-solder the antenna from the circuit board. Remove the antenna , setting it aside – but be sure to mark or take note of its original location.
- Measure the distance between your opener and the front of your garage. Cut a piece of standard RCA cable to match the distance you just measured.
- Remove the external layer of insulation on the end that you would like to connect to your operator.
- Separate the inner shielded insulator (likely white), and the braided wire shield. Take care to keep the inner insulation from being damaged at the point where it goes into the shielding.
- Solder the center conductor to where the original dangling wire was attached on the circuit board. (You marked this on your logic board in step 4.
- Solder the shielding wire to the closest ground point on the board. Obviously, make sure you don’t short out anything with the bare wires. Also, make sure that as you heat the shielding wire, that it doesn’t melt the center conductor insulation.
- On the other end of the long RCA cable, cut the wire shielding back about an inch from the end so that only the center insulation and conductor are visible.
- Attach the original wire to the center conductor. Use electrical tape to cover the solder point.
- Fasten your wire to the header of your garage door (the space between the top of your garage door and the ceiling)
7. Power Down Troubleshooting Test
- Locate your circuit breaker box. You might want to have two people for this troubleshooting test.
- Power down ALL circuit breakers except the one powering your garage door opener
- Test the range of your remote control. If the range improves then you can determine that the device causing interference is not in the garage. If it does NOT improve then it is likely that the interference is being cause by an electrical component in the garage.
- Power on one circuit breaker at a time testing your remote range each time. When your remote range becomes poor once again, you will know what circuit (room in the house) is causing interference.
- From there you can focus on that circuit (room in the house). For example, If the remote range became poor when the kitchen circuit breaker flipped on you need to focus attention on that. Unplug all devices connected with the kitchen circuit.
- Plug in one device at a time testing remote control range for each.
8. Multiple Garage Door Opener Troubleshooting Test
If you have multiple garage door openers and only one has poor signal range there is another test you can try. You will be able to test both the operator and remote control.
- Start by unplugging the opener that has good range powering down this unit.
- Test the opener that has the poor range.
- If the bad opener suddenly has good range again, then the other unit in your garage is causing RF interference. You will need to replace the light bulb and/or logic board.
- Test all the remotes you have on both openers to rule out a remote being defective. If one remote has good range and the other doesn’t you have a bad remote.
I write tutorials about garage door repair, installation and maintenance. With over a decade of experience in the overhead door industry I’ve learned a lot and I’d like to share my knowledge with you.