

Insulation Kit: How I Saved $100 Annually On My Energy Bill
Installing an insulation kit in your overhead door will make the garage warmer in winter, cooler in summer, all while lowering energy bills. Adding polystyrene vinyl backed insulation to an existing door is also a cost effective DIY project; at under $100 for a standard single car door.
The garage is one of the least energy efficient spaces in your house. This is especially true if you have a non-insulated wood, steel or fiberglass garage door. Given the fact that garage doors have large surface areas you can be certain that your non-insulated overhead door is adding to your high winter utility bills. There are a few things you can do to improve your situation.
Upgrading your overhead door to an R-17 rating can cost thousands of dollars in material and labor costs, making it impractical for most homeowners. Luckily, you can cost effectively add a styrofoam insulation kit to the back channel of your garage door for less than $100. You have a few options based on your existing door material and design. Garage door insulation kits are a cost effective way to improve energy efficiency and reduce noise. Here are a few things to consider before purchasing an insulation kit.
What is R-Value?
R-value is the measure of a barriers ability to resist the transfer of heat per unit of exposed area. The higher the R-value the greater the resistance is to heat transfer, so higher R-values are more desirable. They are also much more expensive as well and this is no different for garage door insulation. The R-values of overhead doors range greatly depending on the type of insulation inside the door. Garage door insulation varies from R-4 all the way up to R-18.
What Rating Do I Need?
The level of insulation you need will depend on your goals and what already exists in your garage walls. Its best to match your garage doors R-Value to the insulation of your garage walls. If you plan on using your garage for a workshop or if you have a living space above the garage than a high R-value is best. Unfortunately, achieving R-18 involves ordering new door panels with urethane insulation injected from the factory. For most people retrofitting a door for a foam panel polystyrene insulation kit is the best option.
Polystyrene vs Polyurethane
Two main types of insulation are found in garage doors; polyurethane and polystyrene. Polyurethane insulation is the best option for cold weather climates, but comes with a slightly higher price. Garage doors with high R-values utilize polyurethane insulation. Urethane foam is sprayed or injected into the garage door and is protected by steel skins on both the interior and exterior directly from the manufacturer.
Sprayed in polyurethane has a big advantage in that all of the small spaces and joints of the door panels are insulated. The foam has such a tight fit that it actually increases the rigidity and durability of the garage door. Urethane insulated doors generally carry R-10 to R-18 ratings based on overall door thickness. The maximum R-value on a 2″ thick garage door is 18, while some 1.5″ thick doors have ratings near R-10.
The second type of garage door insulation is called polystyrene – more commonly known as Styrofoam. This type of insulation is often exposed and is installed by snapping in under door stiles or directly bonded to the door with adhesive. Styrofoam insulation is easily identifiable as it comes in the form of white colored foam sheets with a protective vinyl coating.
Unlike polyurethane insulation which is injected into the door cavity, polystyrene insulation comes in the form of a rectangular foam sheet panel. Since it comes in a pre-formed shape it leaves small air pockets and is less dense than urethane. Most builder grade garage doors have exposed Styrofoam polystyrene insulation with ratings of R-4 to R-8.
Types of Insulation Kits
BATT insulation
Blanket insulation and usually comes in the form of a roll. If you have ever looked inside an exterior wall you have likely seen pink or tan fiberglass BATT insulation. It is extremely flexible and comes with a paper or foil backer, If you garage door shape won’t accept any other type of insulation this is always a viable option.
Reflective Insulation
Recognized by its reflective aluminum foil backer, this type of insulation is a decent choice for garage doors in extremely hot climates as it reflects radiant heat – up to 90%. If you don’t mind the inside of your garage door looking like NASA space equipment, this is the kit for you.
Foam Panel Insulation
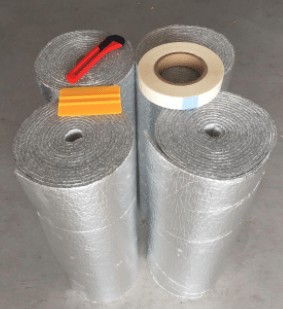
Foam comes in pre-cut polystyrene sheets. Kits are usually made up of a quantity of eight panels of 1″ thickness. These panels provide an R-value in the range of R-4 to R-6.5 depending on thickness. These sheets can be cut to fit and can be installed on most non-insulated steel back garage doors. This insulation has a white vinyl back coating that is resistant to moisture and debris.
Tools & Materials Needed
- Insulation Kit – 8-piece vinyl back insulation kit for single door (two kits are needed for double doors)
- Measuring Tape – Used to measure the void space in the interior of your garage door. Measuring both the height, width and thickness.
- Ladder or Stool – The top section of your garage door may be difficult to reach as most garage doors are 7ft or 8ft in height.
- Pen – For recording measurements and marking cutout areas on the foam insulation panels
- Straight Edge – You will need this to cut the foam paneling in a straight line.
- Razor Blade – A sharp razor blade tool works best for cutting through foam. A knife could also be used.
Measuring Your Door Dimensions
Insulation kits can be installed in under 90 minutes by most homeowners given the proper tools and insulation kit. Before attempting to order or install an insulation kit you need to measure the current door panel configuration. You will need to measure once to plan out what kit to order and again when cutting the insulation sheets to fit the back of your door.
- Measure the overall door width and height. A single car garage door (9ft wide x 7ft tall) requires one (8) piece kit while a double door (16ft wide x 7ft tall) requires two kits.
- Measure the height of ALL garage door sections including the small space under the lip of the door section. Chances are all of your sections are the same height (21″) but some can be different heights from 18″ to 24″. Most insulation kits include pieces that measure 20.25″ to fit securely in a 21″ section.
- Measure the stile to stile width measurement, including the small space under the lip of the stiles. Most insulation kits include pieces that measure 54″ in length to fit securely under the lip of your garage door stiles.
- Measure the thickness of your garage door. Most insulation sheets are between 1.25″ – 2″ thick and fit securely into a 2″ thick garage door.
Best Garage Door Insulation Kits
| Insulation Kits | Dimensions | R-Value | Single Car Door $$$ |
|---|---|---|---|
| Matador | (8) 20.2"/ 23.2 x 54" x 1.20" | Polystyrene Sheets - 4.8 | $90 / $105 |
| Cellofoam | (8) 20" x 54" x 1.25 | Polystyrene Sheets- 4.5 | $95 |
| Owens-Corning | (8) 22" x 54 x 2.25" | Rolled BATT - 8.0 | $90 |
| Foam Core | (4) 9ft x 21" Rolls | Rolled Foam -8.0 | $70 |
Matador Garage Door Insulation Kit
This kit includes (8) 20.2 x 54 x 1.2 inches foam EPS sheets. They also have a larger size kit with sheets measuring 3″ taller in height (23.2 x 54 x 1.2 inches) for a slightly higher price. This is a great option as some residential and commercial doors have 24″ tall garage door sections as compared to the 18″ and 21″ industry standard height. The kit comes with an R-4.8 value. Much like other foam insulation kits, the flexible ribbed sheets are installed into the back channel of the door. The panels also come with a bright white vinyl backer that can be easily cleaned.
One kit is designed to cover a single door (9ft wide x 7ft tall). Two kits must be purchased for double garage doors.
Important Features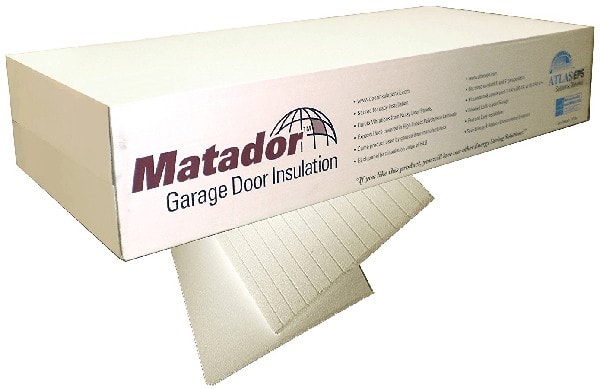
- R-value 4.80 @ 75F
- Vinyl Exterior Protective Coating
- Larger 22.2″ Sheet Height for 24″ Door Sections
- Bright White Vinyl Back Protective Coating
- Pros Larger 22″ height available / Clean Design
- Cons Lower R-value compared to other kits
Type: Foam Panel
Cost $85-$95 20″ Height Kit (2/5/2018)
$$95-$105 22.25″ Height Kit (2/5/2018)
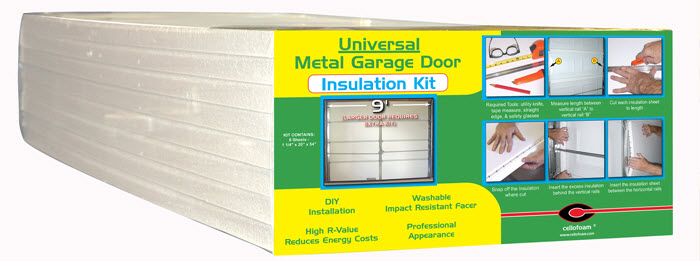
Cellofoam North America Garage Door Insulation Kit
This kit includes ![]() (8) 20″ x 54″ x 1 1/4″ foam expanded polystyrene (EPS) insulation sheets. The face of the sheets have a protective high impact styrene laminate coating that provides an aesthetic finish, increased durability, ease in cleaning and moisture barrier. The kit has been rated by ASTM standards as an R-4.5 at 75F. It will also help reduce road noise coming from outside the garage. The foam panels have kerfing on the interior to allow the sheets to bend into place during installation.
(8) 20″ x 54″ x 1 1/4″ foam expanded polystyrene (EPS) insulation sheets. The face of the sheets have a protective high impact styrene laminate coating that provides an aesthetic finish, increased durability, ease in cleaning and moisture barrier. The kit has been rated by ASTM standards as an R-4.5 at 75F. It will also help reduce road noise coming from outside the garage. The foam panels have kerfing on the interior to allow the sheets to bend into place during installation.
One kit is designed to cover a single door (9ft wide x 7ft tall). Two kits must be purchased for double garage doors.
Important Features
- R-value 4.50 @ 75F
- Kerfing for easy installation
- High Impact Styrene (HIPS) Exterior Barrier
- Easily washable white colored coating
- Pros – Clean Design / Durable Design
- Cons- Lower R-value compared to other kits
Type: Foam Panel
Cost: $90-$100 (2/5/2018)
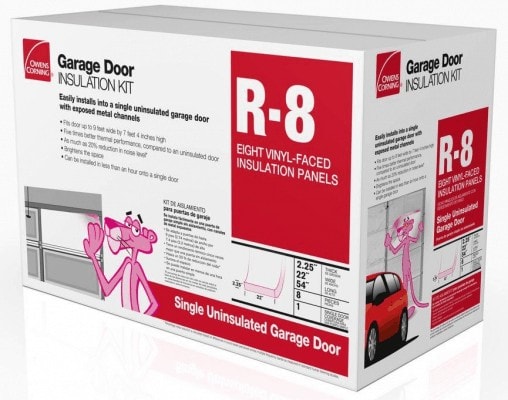
Owens-Corning Garage Door Insulation Kit
![]() Unlike the hard foam panel insulation kits, Owens-Corning created a flexible rolled BATT insulation kit design. The kit includes (8) rolled fiberglass R-8 insulation sections measuring 2.25 in thick. x 22 in tall x 54 in long. The kit contains a fastening system that secures the insulation strips in place with retainer clips.
Unlike the hard foam panel insulation kits, Owens-Corning created a flexible rolled BATT insulation kit design. The kit includes (8) rolled fiberglass R-8 insulation sections measuring 2.25 in thick. x 22 in tall x 54 in long. The kit contains a fastening system that secures the insulation strips in place with retainer clips.
One kit contains enough marterial to insulated a single garage door (9ft wide x 7ft tall). Two kits must be purchased for double door applications.
Important Features
- R-value 8.00 @ 75F
- Flexible BATT fiberglass insulation
- Unique retainer clip fastening system
- Decreases noise by 20%
- Increases thermal performance vs non-insulated doors
- Pros – Higher R-value / Flexible Material
- Cons – Retainer clips can break / Material can come loose
Type: Roll BATT Insulation
Cost $85-$95 (2/5/2018)
Foam Core Reflective Rolled Insulation Kit
This insulation kit is best suited for warm weather climates where direct summer sunlight is more of a problem than cold winters. The material is composed of a solid foam core protected by two radiant barrier reflective foil sheets. One side has a white vinyl finish and the other side has a reflective coating.
Doors that are exposed to direct sunlight throughout the day would benefit from this material. This kit is designed to decrease the internal temperature of your garage door (up to 50 degrees) and reduces the passage of radiant heat by 90%.
Since the kit comes in the form of thin rolled sheets it can be used on garage doors that lack deep insert spacing. The insulation sheets fasten to the interior frame of the door panels with tape, leaving a tiny air pocket between the garage door an insulation. It can also be glued to the interior of the garage door with adhesive if fastening to the frame isn’t an option..
Important Features
- Best Used In Warm Climates
- R-Value 6
- Reduces radiant heat transfer by up to 90%
- Reduces interior surface temperature by up to 50 Degrees
- Reflective coating & White vinyl finish reversal
- Pros – Best use on doors getting direct sunlight
- Cons – Bad quality tape. Requires separate 3M or gorilla tape purchase
Type: Rolled Foam with double side protective coatings
Price: $65-$75 Single door 9×7 size (2/5/2018)
$90-$100 Double door 16×7 size (2/5/2018)
Foam Panel Styrofoam Insulation vs Rolled Fiberglass BATT Insulation
The type of insulation you decide to use on your garage door should depend on your individual needs. if you live in a cold weather climate with harsh winters maximizing your R-value should be top priority. The Owens Corning insulation kit carries the highest R-Value available (R-8) while foam panel insulation carries a rating of only R-4.8.
If you live in a moderate climate with mild winters then a foam panel insulation kit might suite you better. Foam sheets have a lower R value than their rolled fiberglass rival. However, the clean professional look of foam paneling is far more pleasing to the eye. The bright white vinyl backer is easily cleaned and can be fixed in the event of puncture with vinyl back repair tape.
Foam panels are definitely easier to install. The sheets of styrofoam can be cut to fit with a razor blade and straight edge. Blanket insulation installation involves a lot of adhesive and tape, while foam can simply be tucked under the channel of steel garage doors. In terms of ease of installation the advantage goes to the foam panels.
Regardless of what version of insulation you select, a covered face is a necessity. Styrofoam and fiberglass insulation can easily flake or peel off if its not covered by a protective barrier. This creates both a messy and potentially dangerous situation since breathing in insulation particles is a health hazard. The covering also provides some water resistance. Keep a close watch on the bottom section of your garage door, as it is most likely to come into contact with water being closest to the ground.
In terms of price, both types of insulation are very similar. Single car doors can be insulated for under $100 and double doors less than $200. Its just a matter of performance against aesthetics since foam insulation looks more professional, while rolled insulation has better performance. Durability is a non issue with proper maintenance and cleaning. Most garage door insulation will outlast the longevity of the garage door itself.
Insulation Energy Efficiency Results
Will my energy bills decrease?
What can you expect in terms of energy efficiency and garage temperature improvements? While browsing some message boards and product reviews several case studies were provided by customers. In the majority of cases foam insulation seemed to improve temperatures 7-10 degrees compared to the outside. In other words, outside temperatures of 30 degrees resulted in garage door temperatures of near 40 degrees. Rolled fiberglass insulation had even better results, with average improvements of 12-18 degrees.
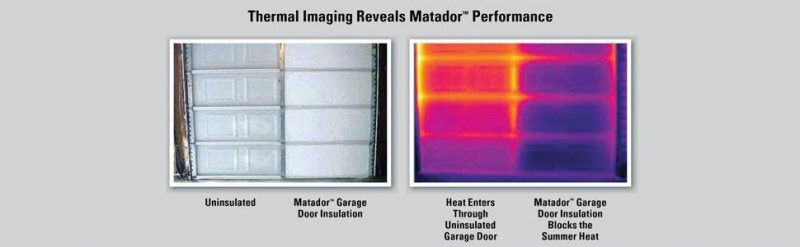
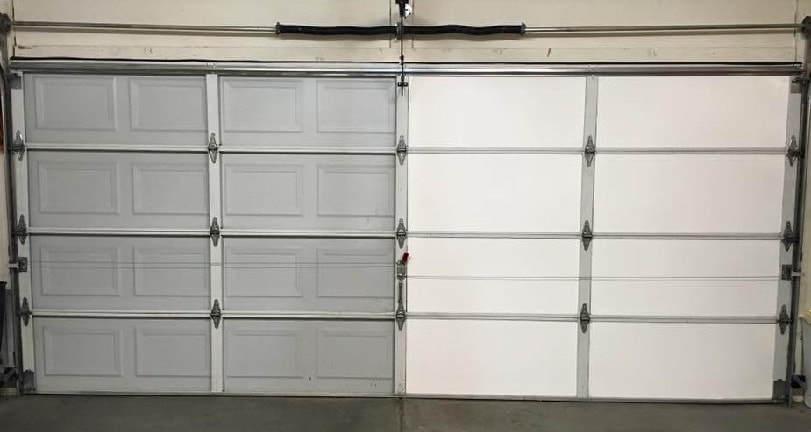
The image above shows a thermal view of your garage door. The left side of the door is a typical open back uninsulated steel garage door . The right section shows thermal energy after their insulation kit has been installed. The insulation kit helps to both block summer heat and the winters cold.
Results will vary on a case by case basis and no manufacturer will guarantee results. Several variables come into play when measuring the before and after results of insulating an overhead door. I would definitely recommend a few other insulation techniques in addition to installing an insulation kit. After you install an insulation kit you should also replace your garage door perimeter weatherstrip – bottom, side and top seals.
The wood frame of your garage door has a weatherseal called vinyl door stop. Its made up of a hard solid base and a flap that is designed to protect water, debris and wind from entering the garage. The vinyl door stop (VDS) is installed with matching color aluminum trim nails.
The bottom of your garage door should have an aluminium extrusion called a retainer. Bottom seal is installed on this retainer by simply sliding it through the channel. Some older doors made of fiberglass or wood may not have a bottom retainer. In this case you would need to use adhesive or trim nails. Many different types of bottom seal exist to it is important to match your existing seal to what you intend to purchase.
A visual inspection is necessary to determine if your weatherseal needs replacement. Vinyl door stop and bottom astragal are prone to dry rot and shrinkage. Look for cracks and gaps in your seals where air, water, snow and debris could enter the garage.You can always close your garage door and turn off all of the lights. If you can see daylight around the frame of the door you probably need to consider replacing your seal. Bottom seal can also flatten out overtime and lose its ability to seal out the elements. Consider replacing the seal and installing a backer rod or old garden hose between the seal and retainer. This should allow it to hold its shape longer.
Garage Door Insulation Kit Installation – Foam Panel
- Before doing anything else be sure to unplug your automatic garage door opener if one is installed. This will prevent anyone from trying to open the door while you are installing your insulation panels. The remote control and wall button will not be able to run the door. Alternatively some openers have a wall button with a “lock” feature. This also prevents the door from being opened. Just be sure to test your remote and wall buttons after engaging the lock button to make sure it is enabled and working.
- Unbox your foam insulation paneling being sure to set the panels on a smooth flat surface with the finished vinyl side facing up (ribbed side down). This will keep the vinyl back coating clean and free from punctures. You should have 8 individual white foam insulation pieces measuring 20.2″ tall x 54″ wide x 1.2″ thick for 18″-21″ residential section heights. If you have a commercial panel garage door you should have 8 foam pieces measuring 23.2″ tall x 54″ wide x 1.2″ thick for 22″-24″ tall garage door sections. Keep in mind the height of your insulation foam panels should be slightly less than the height of the metal section.
- Measure the height and width of each panel on your garage door as some doors are composed of different size sections. Be sure to include the small space (lip edge) under the metal garage door stiles as the insulation panels will tuck under that piece. Record the measurements on a sheet of paper.
- Remove any struts or angle iron serving as reinforcement on the inside of your garage door that will be in the way. To properly install insulation these pieces will need to be removed temporarily. Don’t worry your garage door is plenty strong enough without them for a short period of time. You will likely need a drill and 1/4″ or 5/16″ hex bit to loosen the self tapping TEK screws. Some of the fasteners holding your hinges in place may also need to be loosed later on.
- Start marking and cutting your first insulation panel based on the measurements you have taken. Your will need a straight edge, pen and razor blade to accurately cut the foam panels to size. The foam panel should be slightly less than the height of your door. The length of the foam panel should also be slightly less than the width as well. Mark the insulation panel using your level or straight edge. Then use the razor blade to cut the foam insert to fit the desired size.
- If your garage door has windows you have a little trickier installation in the making and may need special window frames. You will need to cut out the insulation to trace around the window frame. Secondly, you will need to order different window frames that are designed to be installed on foam insulation. They are thicker frames that are designed to be installed around the thickness of the insulation. You can use the existing frames, but the white insulation will be in view when looking in.
- Begin sliding the foam paneling in the back cavity of the door starting at the flush end. The foam panels are flexible and have a ribbed backing so you can bend the piece to fit under the edges of the garage door. Slide the foam panel the full length of the cut out area tucking the end under the metal door stile. This process will require a little finesse and patience. It also helps if the foam insulation is stored in a warm environment prior to installation to maximize flexibility. Cold freezing temperatures tend to make the foam less flexible.
- Repeat this process for each of the individual cut out cavity areas in the interior of your garage door. Again, make sure to measure each panel individually as sizes may be unique to each section. Single car doors require one insulation kit while double doors require two insulation kits.
- After installing insulation inserts in each section on the back of your garage door you can begin re-installing reinforcement struts that were removed in step 2. If you had to loosen fasteners on any of your door hinges those will need to be secured as well.
- Perform a balance test on your door after a complete installation. What you will tend to find is that your door is unbalanced due to added weight of the insulation panels. Disconnect your opener using the red release cord by pulling on it until you hear and see the trolley disengage. Make sure your door is in the closed position first. Raise your door up by hand until it is about waist high. It should sit in the opening steadily. If it begins drifting down you probably need to add tension to your torsion springs. A half turn of added tension should be sufficient, but always test before adding increased tension. If you have extension springs you may need to upgrade to a higher weight rating by purchasing entirely new springs.
Adjust Springs for Insulation Weight
After installing your overhead door insulation kit and replacing worn out weatherseal you aren’t completely finished. Although the insulation kit may not feel heavy during handling it actually weighs almost 10 LBs. If you have a double car garage door you can almost double this figure. After installing your insulation kit you will need to adjust your torsion spring tension or completely replace your extension springs. You might be able to get by without adjustment on a single car door, but double doors will be out of balance.
Always perform a balance test on your door by disconnected your garage door opener with the red emergency release cord. The door should be fairly easy to lift off the floor and should balance about waist high without drifting down. Manually raise and lower the door checking for smooth operation. After installing insulation your door will be dead at the bottom when closed. Failing to adjust your spring tension will decrease the longevity of your garage door opener. The opener will have to work extra hard to lift the door up in the closed position. The end result is a stripped white nylon gear inside the motor casing.
